Cosori Food Dehydrator Reviews
This post may contain affiliate links. We may earn a commission if you purchase via our links. See the disclosure page for more info.

Cosori food dehydrators are a great brand of dehydrators that will make food preservation through drying food easy and fun! Here’s a real-life review of one of the best dehydrators for beginners!
This post may contain affiliate links. Read our disclosure policy here.
Benefits of a Cosori Dehydrator
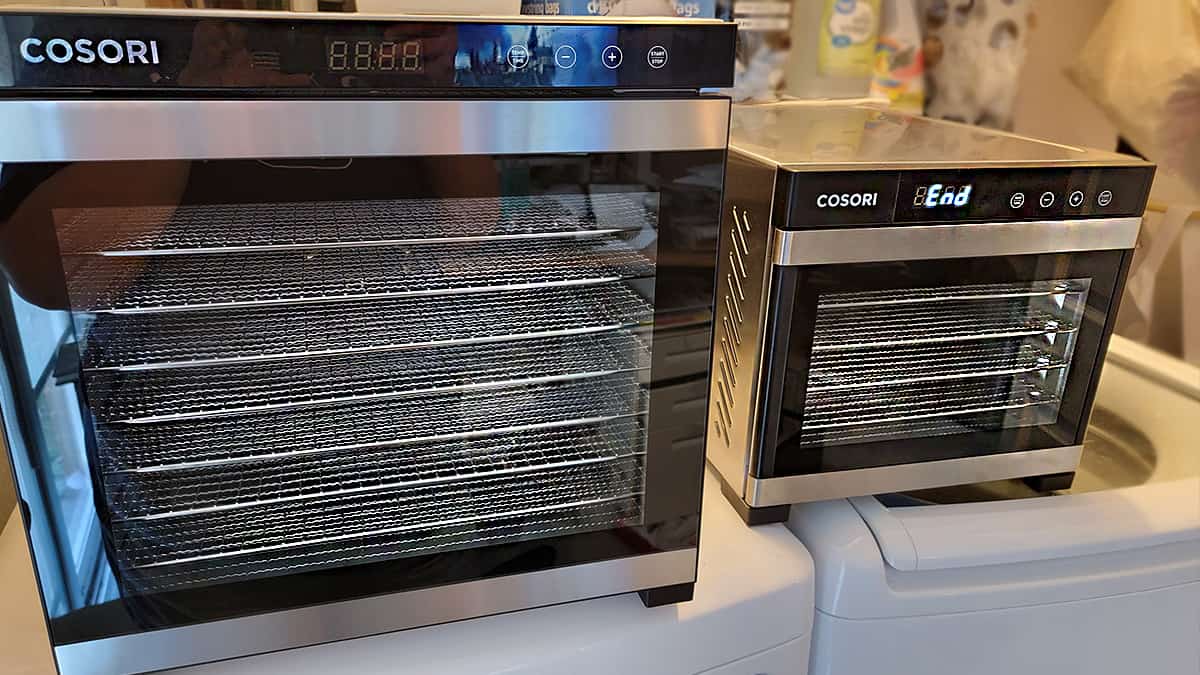
This section will be about the Cosori 6-tray dehydrator. While its 10-tray big brother has more wattage, I found that it doesn’t dry any faster (just more volume), and other than size, is virtually the same in all aspects.
Pro’s
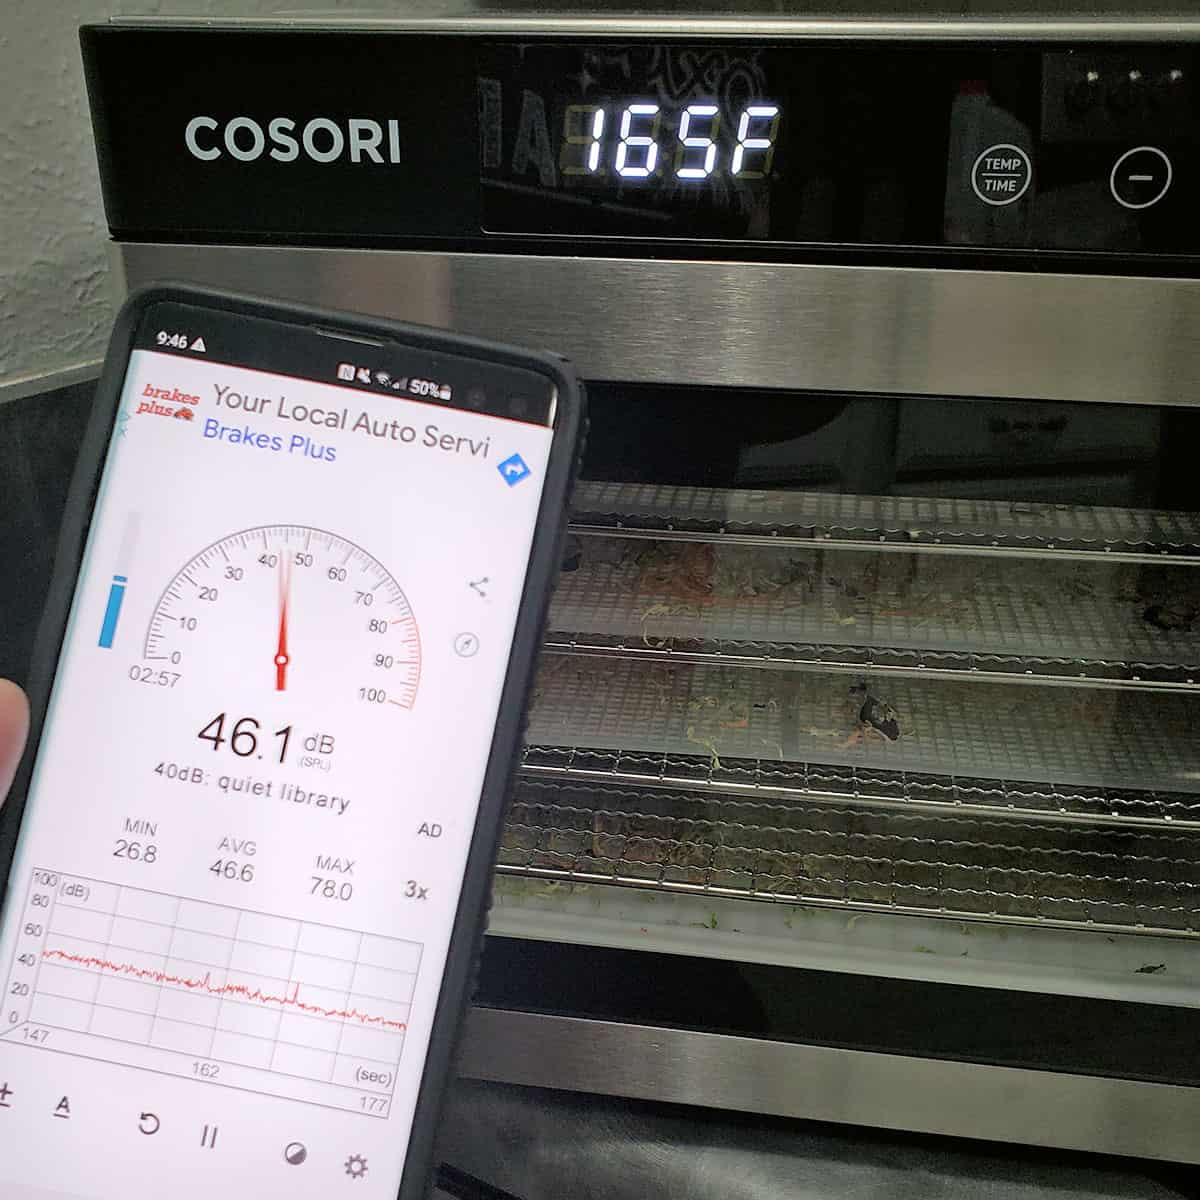
- Quiet – 46.1 dB. As one of the quietest machines on the market, the Cosori can be placed almost anywhere without affecting the room’s ambiance significantly. It currently sits in my laundry space, and with the door closed, I cannot hear it at all. In my kitchen, it is a quiet hum. The 10-tray machine is less quiet but still quieter than an Excalibur, which is comparable in size.
- 6-trays with generous clearance between trays (no need to remove every other tray to do bulky produce as with the Excalibur)
- 600 watts – dries very well with the rear fan across all the food.
- Not too large – at 17.8 x 13.5 x 12.2 inches, it can easily fit on most countertop spaces. I have a small kitchen that takes up the whole space over my dishwasher (which sits next to the sink area), so I moved mine to my laundry closet on my dryer, and it’s perfect. The 10-tray takes up the dryer space and is a little more awkward to move around).
- Stainless steel trays fit in most dishwashers.
Con’s
- Doesn’t come with enough tray liners. With stainless steel trays, things stick easily or fall through the open grid. While Cosori provides two mesh sheets and one solid fruit leather sheet, I recommend purchasing an off-brand mesh set as you’ll want to use it all the time. You can use parchment if you prefer
- The fruit leather tray works better as a dehydrator liner. I personally prefer to use regular fruit leather sheets to do any liquid dehydrating as the tray provided warps fairly easily. Insert it into the bottom of the machine to help make clean up easier, then purchase some fruit leather sheets. I prefer the Simply Homey Dehydrator Sheets for an inexpensive option, but there is a set of mesh plus lipped silicone liners for fruit leathers.
- The stainless steel shelves can be very sticky and hard to clean with things like fruit and very moisture-laden vegetables. I do recommend using mesh or parchment paper on most projects.
- The auto-turn-off feature for overheating does not always work. I did experience an overheating with my 10-tray machine that resulted in removing the machine from my home. Unfortunately, in this instance, Cosori’s home company did not replace the machine or even respond to my concerns.
Stats
This is the 6-tray dehydrator
- 6 stainless steel trays
- Adjustable temperature from 95°F-165°F (35°C-74°C) but in Fahrenheit readings only
- 6.48 square feet of drying space (1.08 square feet per tray)
- Touch-Control LED Display
- Timer (30 min–48 hr)
- 600 watts
- Stainless steel construction with glass door and plastic feet/facing
- Includes 1 mesh liner and one plastic fruit leather sheet
- Manual & recipe book ( Need a replacement manual?)
- 48 dB
- Voltage: AC 120V 60Hz
- Overheat protection (shuts off when the machine gets too hot)
- Size: 17.8 x 13.5 x 12.2 in
- Tray size: 12 in x 13 in
My Cosori Dehydrator Review
Here are my real-world thoughts about my Cosori Dehydrator.
Quick review: it’s a great machine. It’s quiet, easy to handle, and a great value. I’m happy I purchased mine. I use it 80% of the time now.
Timer pause: When checking on your food, if you have the door open too long, it will reset the time. It would be great if there was a pause button for checking on food.
Needs more liners – I also wish they included enough mesh liners for the whole machine, without an additional purchase. This is the number one issue with my readers as well.
Read the manual, then ignore it – Read it to understand how the machine actually works, then ignore it for everything else. As with many dehydrators, manuals/recipe books are written from the perspective of snacking on things or in countries where things are done a little differently. Many of the times and temperatures are incorrect for long-term storage (they recommend that foods can only be stored for a few weeks), and some of the recipes don’t work for longer-term storage. That’s not to say that they may not be yummy for you, but take the recipes with a grain of salt.
Reports of duds – as with every electronic device made in the last ten years, with the replace it instead of fix it mentality, there are duds. We get occasional reports of a model dying. Cosori’s customer service is usually very quick to take care of any issue. But those issues happen with every manufacturer I’ve seen, including Excalibur.
How to Use
Before you begin to dehydrate any food, prepare your machine. Follow these steps:
- Read the manual. While I don’t recommend their manual for the dehydrating section, I do recommend reading on how to work the actual machine.
- Find a dedicated plug that gives six inches of space around the dehydrator.
- Set the temperature to 160°F (70°C) and run for thirty minutes.
- While you wait, read up on these dehydrating tips to help you get started.
- Once the 30 minutes is up, allow the machine to cool, then wipe the inside and trays with warm soapy water to remove any build-up from the manufacturing process.
- Pick one of these best dehydrating recipes to try.
- Place mesh on your trays (if you didn’t purchase extra mesh, I recommend extra mesh dehydrator sheets like the ones I have in my Amazon shop that I recommend over the Cosori mesh, You can also use parchment paper, also.)
- Place prepared fruits or vegetables on tray, giving a little space for airflow.
- Set the Temperature and Time (but remember, time is only when the machine turns off, not when the food is done, so you’ll need to test for that).
- Once you think it is done, allow a sample or two of food to cool, test for dryness,
- If it is dry, you’ll need to condition it. If not dry, turn on the machine for more time.
- Once dried and conditioned, you can optimally store dehydrated food in an airtight container for up to two years.
Cosori Coupon Codes
You can purchase Cosori dehydrators at many online retailers, but Cosori has extended special savings to The Purposeful Pantry readers with these links and special discount codes (ignore their 10% off coupon when you enter the site).
- Cosori 6-Tray: USE CODE TPP23 $126.99
- Cosori 10-Tray USE CODE TPP2023 $239.99
Both come with free shipping in the contiguous US.
Details:
- This is Cosori’s parent company, Vesync
- It is for the contiguous US only (but see below for Canadians!)
If you’d prefer to purchase through Amazon, you can get both the Cosori 6-tray dehydrator and the Cosori 10-tray dehydrator. Be sure to look for warehouse deals, too!
Cosori is Now Available in Canada!
While this isn’t the discount I can give you through our deal with Cosori’s company, they are available in Canada now for you to purchase!
Get it now! 6-Tray Cosori
Alternatively, look at the Ivation 10-Tray Dehydrator or Magic Mill 7-tray Food Dehydrator, which are virtually the same machine with different brand packaging.
Warranty
The Cosori standard warranty is one year. However, you may be able to purchase an extended warranty depending on where you purchase your machine. Amazon offers an extended warranty, as well as other third-party warranties on other platforms.
Cosori’s customer service is usually quick to remedy situations, though they may ask for video evidence of an issue to determine the fix.
Cosori’s customer service phone number is (888) 402-1684. They are available to assist you from 9 am–5 pm PST/PDT, or email [email protected] for help.
Accessories
The Cosori dehydrators come with a minimal number of liners for their machines. This is one con for the brand. But there are great accessories that make dehydrating easy, and are better than the original pieces made by Cosori.
- Mesh liners – I recommend these silicone mesh sheets for every project as it makes gathering easier and creates little issue of sticking.
- Fruit leather sheets – I love these Teflon-coated dehydrator liners because they can be used on the 10-tray machines and cut down for the 6-tray machines because they don’t contain fiberglass. While Teflon was always an issue in the 80’s, modern Teflon doesn’t react to heat in the same way, and the dehydrator’s temperature isn’t high enough to be a factor. However, if you want a fruit leather sheet that is not Teflon coated or silicone, this solid plastic dehydrator sheet might work for you.
- Fruit leather trays – if you prefer a lipped tray made from silicone, these Bright Kitchen silicone dehydrator lipped trays will be just the ticket. There is an issue with sticking for things that are thin liquid (broths), and if you’re doing fruit leathers, flip them at least once during the process to help stop any issues with sticking.
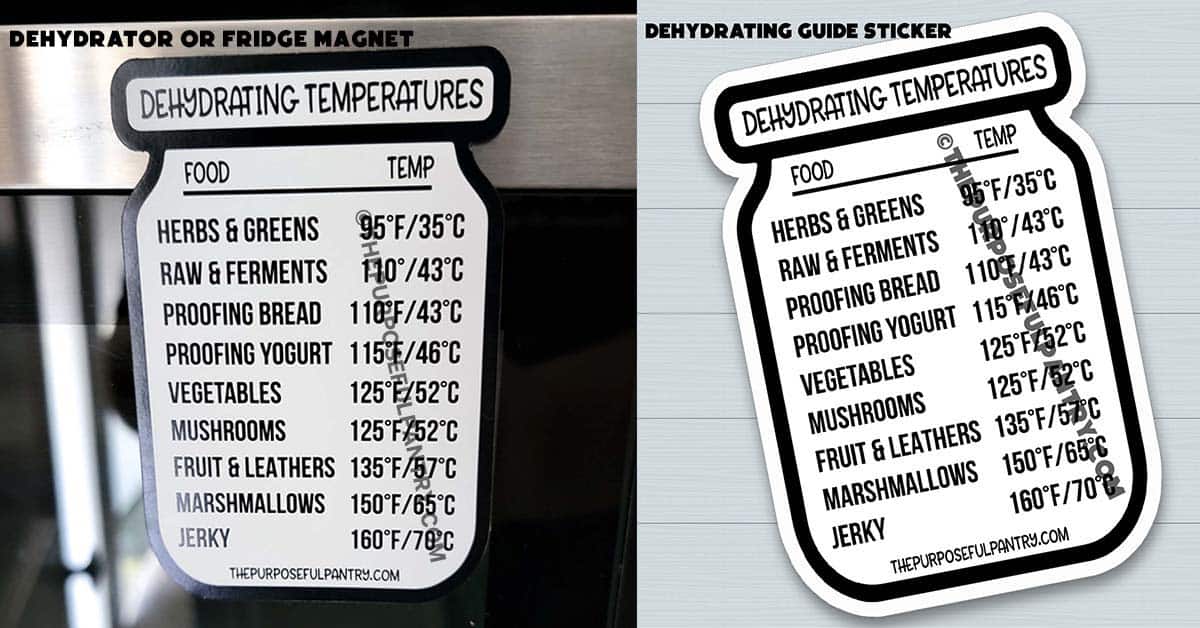
- Temperature Magnet – This handy magnet can be placed on your dehydrator or on your refrigerator to help you find the perfect dehydrating temperature every time!
- Dehydrating Basics and Journal – a how-to dehydrating book along with a dehydrating journal that teaches you how to dehydrate food, and helps you track every project for outcomes, what to try next time, and keeping a record of all you’ve done! It does come in an ebook format so that you can print off only the pages you actually need!
Cleaning a Cosori Dehydrator
More frequently asked questions
While Cosori’s answer to the question is that it was ‘designed in California,’ like 99% of dehydrators on the market, the Cosori is made in China.
While the outer box and the trays are all 100% stainless steel, the door contains some plastic elements, and a glass door panel.
The Cosori is designed to work with 120 volts. Using anything larger will cause the machine to fail.
Per the manual instructions, you should rest the dehydrator for two hours between every 48-hour run.
As with all dehydrators, times for drying should never be by what the book says, but by what is happening in your home. Your home’s humidity level, how you prepared your food, how you packed your trays, what is in your machine, and a variety of other factors can affect how long things take to dry. It’s dry when it’s dry. Use the times given in books, on websites, and in manuals as guidelines only.
I bought the 6 tray based on your recommendation via YouTube, and received it yesterday. Can’t wait to try it! Loved the tip in the article about putting it on dryer. I, too, have a very small kitchen and was trying to figure out what counterspace I needed to give up. I’m going to put it on top of the dryer! Problem solved!
Have fun!
Very good info thanks so much!
Darcy,
Where can I purchase your book?
I have never dehydrated before but am ready to get started. Thank you for your you tube channel. It is so helpful.
https://shop.thepurposefulpantry.com
I purchased a Cosi dehydrator, on 01,06,2024,
It Died 09 26 2024,
Used a couple times a week on all you’ve taught me, which i am grateful.
Any other food dryer you like? I am NOT buying Cosi ever again.
Every manufacturer has their duds – but you can choose from any of these. I use Excaliburs exclusively now, plus an overflow of a Nesco for outdoor projects. https://www.thepurposefulpantry.com/tips-for-buying-a-dehydrator/
I’m a long time “dehydrator” and love your channel and thankful for this bonus discount for investing in a new dehydrator. Left my Excalibur 9 tray back in Idaho when I moved and ready to get back in the game with a Cosori!
Thanks again!
Hope you enjoy using it!!
Thank you! This was a very helpful review. I especially appreciated the pros, cons, and accessories sections.
I’m glad you found it helpful!